



Before cosmetic surgery, clients will be guided by our specialists to take photos in the correct positions. This step may seem simple, but it is actually very important. These photos help the surgeon accurately assess the preoperative condition and develop a detailed treatment plan. They also allow clients to compare the results after surgery. Therefore, this article provides detailed instructions on the standard photography positions at Seoul Center.
Basic position for facial photography
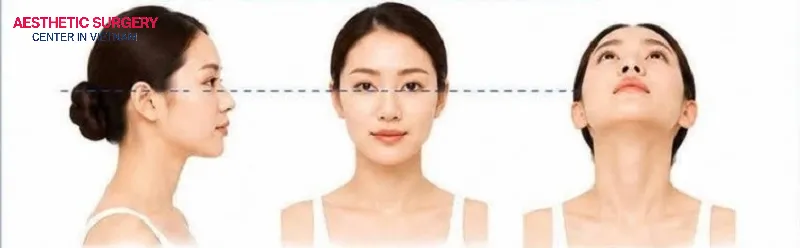
Depending on the surgical area, the specialist will guide the client into the appropriate photography position. However, every position follows these basic principles:
- Sit comfortably on a swivel chair.
- Look straight ahead.
- Keep the line of sight parallel to the floor.
- Keep the Frankfort plane parallel to the floor.
Note: The Frankfort plane is defined by the line connecting the upper margin of the external auditory canal to the lowest point of the lower orbital rim. When this plane is parallel to the floor, the head is in the standard position for evaluating the face and dental occlusion.
Detailed photography positions
To better understand the required photography positions, clients can follow these detailed steps:
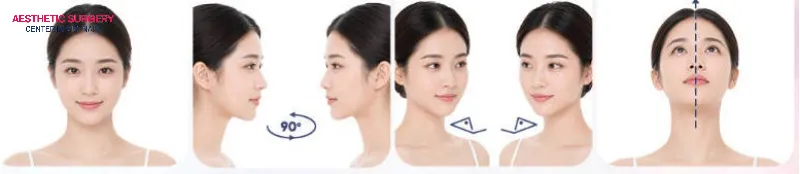
Step 1 – Front view
Look straight ahead so that the image includes the entire head and collarbones, or the full face with part of the neck.
Step 2 – Right and left side views
After taking the front view, have the client turn the entire body 90 degrees from the front-facing position.
Step 3 – Right and left three-quarter views
After taking the side views, have the client turn the head slightly until only one-third of the opposite eyebrow is visible.
Step 4 – Head tilted back (Basal view)
Have the client tilt the head back until the tip of the nose is positioned between the two eyebrows, and both nostrils are fully visible.
In addition to accurately assessing the preoperative condition and comparing postoperative results, these photography positions also provide many benefits for online consultation specialists. This is especially important for clients who wish to receive consultation before traveling to Vietnam for cosmetic surgery.
Therefore, to receive an accurate assessment and achieve the expected results, clients should take photos using the positions described above. They should also ensure the photos are clear, well-lit, and then send them to Seoul Center via Facebook or WhatsApp.
General notes for photography
During the photography process, specialists should pay attention to the following points to accurately capture the treatment area. This helps clients make an objective comparison after cosmetic surgery:
- Use even lighting without shadows.
- Use a plain background, preferably blue or gray.
- Keep the hair neatly tied back and away from the face and ears.
- Do not wear heavy makeup, glasses, or accessories.
- Maintain a natural facial expression with the lips gently closed.
- Clearly record the client’s full name, the date of photography, and photography position.
Specialists should clearly understand these photography positions and guidelines to accurately document the client’s condition. This allows the surgeon to evaluate the case and recommend the most suitable cosmetic procedure. It also helps clients clearly see the changes after receiving cosmetic treatment at Seoul Center.










Comment on the post